I'd like to officially declare Will Richardson my new guru! I've spent the last three days glued to my computer, setting up RSS feeds (with Bloglines and Google Reader) subscribing to blogs. I've put everything on Bloglines; Google Reader allows you to link the feed directly to your iGoogle page, which is fantastic! I do that for the 3-4 blogs I want to make sure to read each day. Then I check Bloglines a couple of times a week. (That's the plan anyway!)
Through all this blog reading, I found some great online apps that I'll discuss later this week. For now, I'd like to share a cool go-around I found. Will's book states that it's not easy to do a free screencast on a Mac. I checked with those wizards on the Apple discussion boards, and they pointed me to a post by Bluemonki that uses a free program called CamTwist and iMovie. His directions are a bit spartan, but I played around a bit and finally got it to capture just the part of the screen I wanted.
If you don't know, a screencast is kind of a poor man's SmartBoard. It lets you capture into video what your screen/mouse does as you perform tasks on the computer, which you can then post online for students to watch. It's an easy individual tutorial.
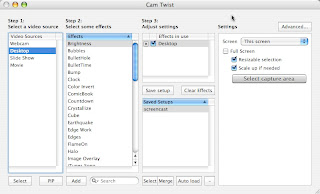
A few more details: Followed the original set of directions. Once you've opened CamTwist, click on "desktop" in the "video sources" screen. Click on s
 elect. Ignore the effects, but under Settings, if you don't want the entire screen, unclick the "full screen" box and click on "Resizable selection" and "Scale up if needed." Drag the black box to the size you want. The scale up box allows the image to be larger automatically if you end up needing that. Start up iMovie, follow his directions, and you have a screencast. There'll be a little gray button that says "done" to click when you're finished. I haven't figured out how to remove that from the middle of the screen yet.
Then just edit in iMovie, add your narration, and you have a screencast. You can narrate as you go, I suppose, but I noticed it picked up all the background noise. So it would probably be better to just add it in later.
On the negative side, the image does seem to be a bit fuzzy, but you get what you pay for, I suppose!
How cool is that??
Of course, if you use Windows, this is all moot as it's one of those rare techniques that's actually easier on Windows than a Mac. Just use Windows Media Encoder, which you can download at the microsoft.com. (You'll also need a microphone). Who knew?!
Sorry the instructions weren't too detailed :) But I'm glad you've gotten it to work! - BM
ReplyDeleteHey,
ReplyDeleteHow do you record with imovie? When I start up imovie and "import from camera" all I get is my built in webcam and no option for cam twist? Driving me crazy
Doesn't seem to work with iMovie 08, as I only can select the built in iSight Camera. Am I doing womething wrong or is it really not working with i Movie 08 anymore?
ReplyDelete